Conversica receives leads through Salesforce Campaigns that are synced with your Conversica conversations. This article will review:
- Syncing a Salesforce Campaign to a Conversica Conversation
- Conversation Setup Options
Syncing a Salesforce Campaign to a Conversica Conversation
Campaign Creation
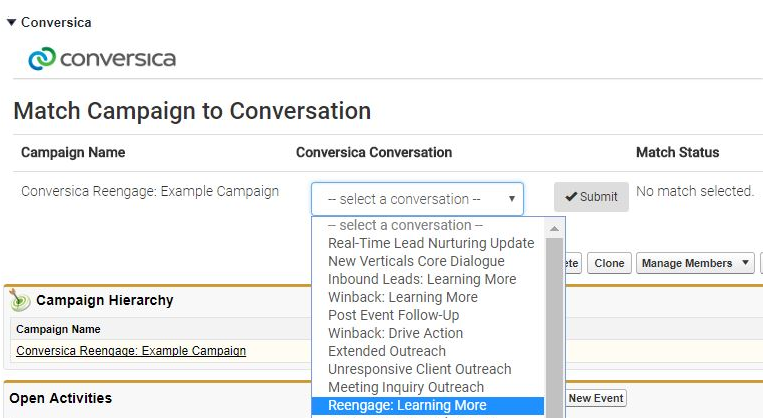
Conversica recommends setting up a brand new campaign in Salesforce when syncing the campaign to the Conversica system. The newly created campaign should not contain any leads or contacts and should be marked as active. Adding leads before syncing to a Conversica Conversation may result in some leads not being picked up. When naming your campaign, choose a name that explains what Conversica conversation the campaign is synced to and that the campaign is for Conversica. Refer to the example below: 
*The max number of SFDC campaigns supported is 420
*Conversica will automatically pick up on campaign name changes, this does not affect a campaign's sync with Conversica
There are two options for syncing your newly created campaign to Conversica:
Contacting Your Customer Success Manager
When contacting your Customer Success Manager, provide them with the following information:
- The Campaign Name in Salesforce
- The Campaign ID or URL
- The Conversica Conversation you would like the Campaign synced to
Your Customer Success Manager will sync the Campaign to your Conversation with a match status of Inactive. A match status of Inactive indicates that the sync has been made but Conversica is not currently pulling lead/contact data from the Campaign. Depending on the Conversation setup method you have decided to go with you may need to contact your Customer Success Manager in order to set up your content for messaging.
Syncing via the Conversica Visualforce Section
The Campaign layout in Salesforce should contain the Conversica Visualforce section. If you do not have the Visualforce section please refer to Conversica App Install and Configure Guide
To sync the campaign:
- Select the Conversica Conversation drop-down.
- Choose the conversation type you would like the campaign to be synced to and click Submit.

The Campaign is now synced to the Conversation that you selected.
The Campaign is initially synced with a Match Status of Inactive and an email will be sent to your Technical Account Manager alerting them of the sync. A Match Status of Inactive indicates that the sync has been made but Conversica is not currently pulling lead/contact data from the Campaign. Depending on the Conversation setup method you have decided to go with you may need to contact your Customer Success Manager in order to set up your content for messaging. In order to activate the sync, you will need to contact your Technical Account Manager.
Conversation Setup Options
You have a few different options when it comes to setting up messaging.
Option A) Salesforce Campaign with Variables Setup on Conversica's End
Conversica's recommended method for Conversation Setup. Workflow:
- In Salesforce, create a New Campaign (add neither leads nor contacts).
- Sync the campaign to the desired Conversica Conversation in the Conversation Edit Tool.
- Send the desired conversation variables to your Customer Success Manager.
- Receive the Preview of Messaging for Approval.
- Activate Campaign (Action performed by your Customer Success Manager).
- Optional: Add a test lead.
Option B) Salesforce Campaign with Variables Setup on Custom Fields on the Campaign Record in Salesforce
With this method, you will need to work with your Technical Account manager to setup Conversica to pull data from your custom fields. You will need to provide the API names for the custom fields and the Salesforce Object the fields exist on. Workflow:
- In Salesforce, create a New Campaign (add neither leads nor contacts).
- Sync the campaign to the desired Conversica Conversation in the Conversation Edit Tool.
- Send the desired conversation variables to your Customer Success Manager for approval.
- Set up variables in your custom fields on the campaign.
- Click Inactive in the Conversation Edit Tool, and change the value to Active to enable the campaign.
- Add a test lead to make sure we are pulling your variables correctly from the custom fields.
Caution:
- For variables that have a whitelist of approved values, we will only accept those values through custom fields. Messaging will default to generic messaging if you pass values not on the whitelist
- Conversica does not have a record of each version of messaging
Option C) Lead/Contact in Salesforce with Variables Setup on Custom Fields on the Lead Record in Salesforce
This version of the setup is useful if you do not want to create campaigns for each version of messaging, but has the greatest opportunity for error.
With this method, you will need to work with your Technical Account manager to setup Conversica to pull data from your custom fields. You will need to provide the API names for the custom fields and the Salesforce Object the fields exist on. Workflow:
- In Salesforce, create a New Campaign (add neither leads nor contacts).
- Sync the campaign to the desired Conversica Conversation in the Conversation Edit Tool.
- Click Inactive in the Conversation Edit Tool, and change the value to Active to enable the campaign.
- Add test leads to make sure we are pulling your variables correctly from the custom fields.
Variation: Setup variable defaults for the campaign on Conversica's end and only pass in a few variables or a single variable through custom fields. For example, all variables default with the exception of the title of a whitepaper, which you pass over in a field on the lead record.
Caution:
- For variables that have a whitelist of approved values, we will only accept those values through custom fields. Messaging will default to generic messaging if you pass values not on the whitelist.
- Variables on the lead/contact must be populated prior to adding them to your campaign
- Conversica does not have a record each different version of messaging

Comments
0 comments
Article is closed for comments.